

(click any image to enlarge)
Hi friends! I'm happy to finally bring you photos of our booth at the Winnie Flea Market this past weekend! Before I do though, I wanted to thank all of you for your kind words of encouragement after my semi-conscious late night post last weekend where I was lamenting all some of the Winnie adventure. You guys made me feel much better, and I wanted to let you know that although we probably won't be doing another show there in the near future, we did end on a strong note and sold quite a bit on the last day. More importantly, we came home with a much lighter load which made all of us happy! It was still fairly brutal packing up for 3 hours and driving the 2 hours home, but we made it and we learned a lot in the bargain...
So, you might want to pour yourself a warm beverage and get cozy because there are a ton of photos...
Here's a BEFORE photo of the space on Thursday night...

...and here are the AFTER photos from the same angle...


...another BEFORE shot...

...and AFTER...

We used these two solid wood cottage doors ($5 each at a garage sale) to anchor the front/center of the booth and feature key products....

...and we also put the Just Bee 'n Me Boutique sign there. I used an old cabinet door to make the sign...

The doors were perfect for displaying various wreaths. I had a lot of fun making this vintage ornament wreath...it's really pretty easy to make, but I have lots of glue gun burns to show for it :o)

I used a standard faux pine wreath as the base for this shabby wreath, and added silk flowers and off white ornaments I had from previous projects. I painted and antiqued a small brass plaque and added it to the center of the wreath. My Dad supplied me with several routed pine sign board and I painted a number of seasonal signs like the Merry Christmas one below the wreath...

Another wreath...and one of several chalkboards that I made for the show...

This started out as a framed print and I simply masked off the frame and painted right over the glass with chalkboard paint... (I was glad that this went home with a very nice young woman)

This is a swag I've had for years - I paired it with one of the brass wall hangings I had painted with heirloom white...


We also featured one of my Dad's birdhouse creations as part of the center display... I painted it heirloom white and black and added the painted "Welcome" sign and polka-dot bow...

One of my favorite pieces was this old washboard that I repainted with chalkboard paint at the top and green paint all over. The metal washboard part was perfect to serve as a magnet board. To make the matching magnets I just spray painted clothespins black, distressed them, and added ribbon and a magnet back...
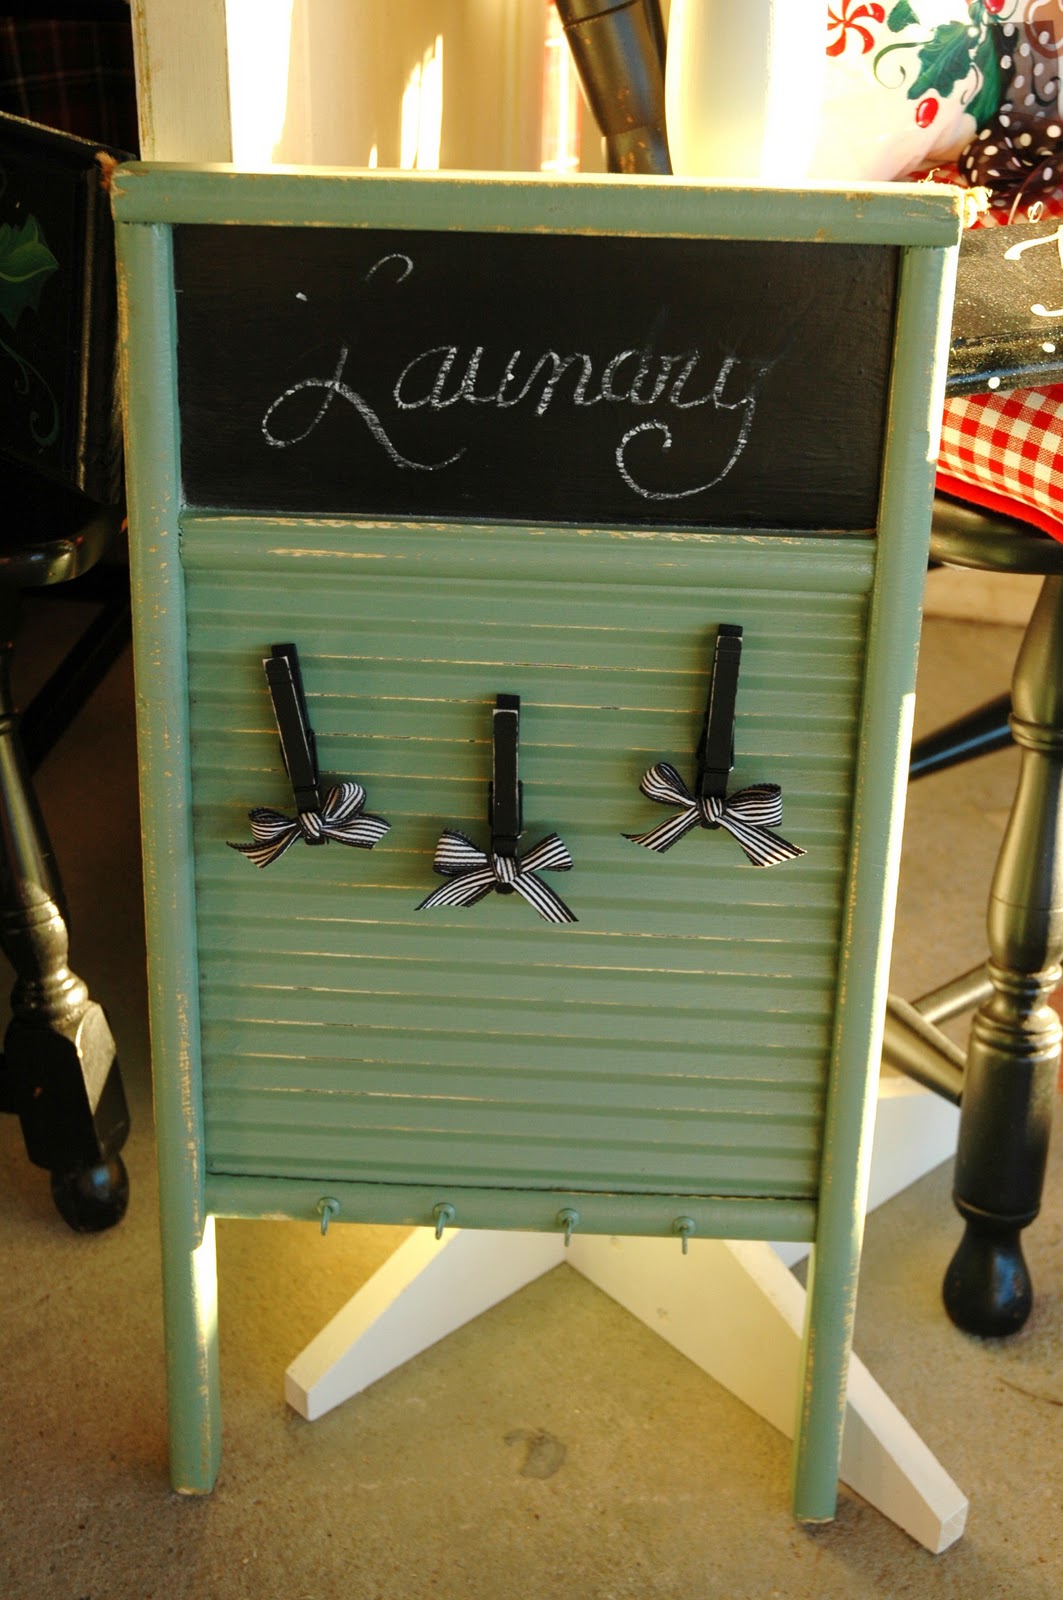
...here's how it looked before...

Directly behind the center door display we had a table for all of the Christmas merchandise...


...and the back tables were filled with shabby stuff. (I'll spare you the details of what happened when the wire hanger on the huge clock broke on Friday...but it wasn't as bad as you might think)...


I made quite a few tea cup candle sticks for the sale. This candleabra was one of my favorites. It started out as an ugly brass thing which I spray painted with Rustoleum "Chrome" silver paint..then I glued on the sweet pink rose tea cups...

...more tea cup, glass, and china pieces...


The following are pieces I made using various sign boards and a mixture of materials I had laying around...


This peg rack below was fun to transform. I spray painted it with heirloom white then distressed it. Then I spray painted three coffee cans black, used a tin punch to punch two holes in each, then strung the black and white ribbon through the holes - easy peasy...

The right side of the booth was where we displayed all the Thanksgiving/Fall merchandise. We anchored the space with a Duncan Phyfe table and six chairs that we recovered. (I bought the whole set originally for just $50)


Finally, on the left side of the booth we had our "check out" stand. This good old black cupboard/bar has served me well in both our antique shop spaces as well as here in Winnie...it's just so versatile...

...I used it to hold my calendars...

...behind it we had our red kitchen-oriented stuff...


Well, those are the booth highlights. I would take the time to write more about the set up, how we did the backdrops, the 30 mile per hour wind gusts we were dealing with the first day of set up, how we priced, and how we moved merchandise quickly on the last day, but I already wrote about that once on this post yesterday and something weird happened and wiped out the entire thing - right when I was on the very last sentence. So what you're reading is my second attempt, and I think I had better stop now and leave well enough alone. Feel free to comment or send an email if you have any questions about any of the process or even the merchandise and I'll be happy to tell you more...
Thanks again for hanging in there with me through this journey...it has certainly been an adventure...
______________________________
Next up on the creative agenda, I am helping style a vintage-inspired at-home wedding mid December for my dear friend's daughter...it's going to be so much fun! I can't wait to share the details and show you the progress!
Meanwhile, have a great weekend friends!

Hi Becky,
ReplyDeleteSo many wonderful treasures and LOVE how you made and set up your booth!
Happy Weekend.
Warmly,
deb :)
Thank you for sharing all the lovely pics. I do love all those tea cup candlesticks. Did they sell well? Also I would be curious how you moved merchandise quickly on the last day. Please don't stop yet with information! Best of luck to you in the future.
ReplyDeleteOMG I can not believe how large your inventory is! It is gorgeous and tons of work I am sure. Good luck on sales!
ReplyDeleteCarol
Wow! You created so many fantastic things! The wreaths are so beautiful and I love the chalkboards you made too! You have such a knack for design! Also I just awarded you a stylish blogger award that you can pick up at my blog:
ReplyDeleteBlessings!
Jenni
http://jennipriceillustration.blogspot.com/
Becky, You have lots of beautiful pieces and ideas, but I still think you could have a backup plan to compile your ideas into a booklet. Others would buy it simply for the ideas. I buy one particular book on a quarterly basis(you probably know the one)just for the ideas. You could price the items, if you wished to, but the items in the magazine I speak of, are too expensive for my pocketbook,so I just use the ideas.
ReplyDeleteyou did a beautiful job! so inviting and sweet. you have given me sooooo many ideas for my new booth. when i say mine i mean mine, mom's, two older sisters, and a friend. it is so much work. i live the closest to the antique mall so i am the one who tends to it every week. i wish you lived near me so you could help me make my space as beautiful as yours :)
ReplyDeleteblessings,
aimee
Hi Becky, I often wonder if the people who shop the booths really take a look at how much "stuff" has to be moved, merchandised and hauled by the sellers. I doubt they have any idea, I know I never thought about it until this post! It sure looks like a lot of work girl. I'm glad you had less to haul back!
ReplyDeleteOh my sweet heavens! I love your booth! I wish I could have had the privilege to shop there. :o)
ReplyDeleteSincerely - Trish