Showing posts with label Mobile Home Makeover. Show all posts

Wednesday, April 11, 2012

Our Mobile Home Makeover Featured on MHL!


I was so excited and honored to have our mobile home makeover featured on Crystal's wonderful website Mobile Home Living over the weekend! Crystal was just the sweetest thing to work with, and her passion to show the beautiful possibilities (and practical realities) of mobile home living is infectious! I wish her site had been around 3 years ago when we were undertaking our makeover - it would have been such a huge help...

I encourage you to check out her site and look through all the incredible transformations! Whether you are a mobile home owner or not, you are sure to find plenty of makeover inspiration! 

Thank Crystal for the lovely feature!

Wednesday, February 24, 2010

Remodeling Reminiscing...


Hello friends! Since it was a year ago this week that we downsized our life and moved into our remodeled mobile home cottage, and since I have a number of new blog followers, I thought I would do a little walk down memory lane and share some of my favorite before and after photos from our remodeling journey...


Kitchen Befores & Afters


Master Bedroom Befores & Afters


Living Room Befores & Afters


Guest Bedroom Befores & Afters

______________________________


It was good for me to take a look back today, because sometimes all I can see are the things that are yet to be done (bathrooms, painting doors, etc), but I forget how far we've actually come. I hope as you look around your life and despair of the things left undone, that you'll take a moment and reflect on just how far you've actually come...

...and take comfort in this...

"And I am certain that God, who began the good work within you, will continue his work until it is finally finished..."
Philippians 1:6

Sunday, September 06, 2009

From Storage Building to Art Studio


It's FINISHED!!!  I am SO happy to report that the storage-building-to-art-studio transformation project is finally complete! I have to give my sweet Hubby a HUGE round of applause and BIG HUGS for his tireless efforts through the late Spring and all the HOT Summer long to convert our storage building into a fully contained art studio for me. Wow - what a guy!! I LOVE you Baby!!! Thank you!!! (Thanks also to my Dad and a neighbor friend for their occassional assistance too!)

I thought it would be perfect to share this metamorphosis for Metamorphosis Monday over at Susan's place, Between Naps on the Porch...please be sure and check out all the other great transformations - it's always very inspiring!!!

Here's where the project began - a 12' x 24' storage building that we had buiult on our property back in February when we downsized from a 1500 square ft. house with a full garage to a 1000 square ft. mobile home with no garage...

It was a great storage building and held all of the STUFF we previously had in our garage as well as overflow from our previous home...

When it became clear that I would need more space for my art, illustration and crafting pursuits, especially now that I was focusing full time on those efforts, we decided to have an identical 12' x 24' storage building built on our property to continue to provide much needed storage, and then to convert this original building into a studio...so that's how the project began...

I have shared fairly detailed photos of the finish out work over the last few months on the blog, so for this summary post, I will only share a few highlights from previous posts as well as the newest photos of the paint and flooring...

The original building only had one window - Hubby added four more so the studio would have plenty of light...


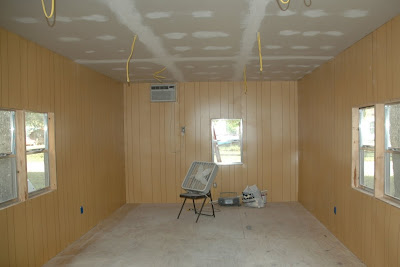
After adding additional plywood decking to the floor, wiring for electrical and phone/data, and adding an air conditioner, the building was ready for insulation and radiant barrier - a real necessity for our hot Texas summers...

We started getting more excited at this point because the rafters, wall board and ceiling were next, which meant paint and flooring would not be far behind...

Finally, it was time to paint, and it was my turn to do most of the work for a change...and give Hubby a bit of a break...I love how the soft yellow turned out...


At this point, things were progressing really quickly and there was finally light at the end of the tunnel (6 of them to be exact  :o)

Then this past week we were ready for the flooring (easy-peasy laminate "tile"...no floor prep needed)...other than it being painful to his knees (even with knee pads), Hubby said this was one of the easiest of all the tasks and it brought a lot of satisfaction when it was done (about 3 hours for 288 square ft., and that was because of measuring and trimming). This is what we have in our kitchen in the mobile home...it is very comfortable to walk on and extremely durable...and it looks good too...


Once the flooring was down, we were ready for adding the baseboards (which we bought already white) and the corner moulding (also white). After nailing all that up and doing caulking and touch up this past Saturday morning, we were finally done...at least to the point that it is now ready to be moved in to (we still have a bit of trim work and painting to do on the windows, but that won't take long and won't stop us from moving in)...

Now, the REAL fun begins - DECORATING!!! We are going to start moving in boxes and furnitire this week and hopefully get the window coverings up, some pictures hung, and some of the fun accessories put out by this time next week.  Here's a little sneak peek at some of the furniture/accessories I will be using to dress up the studio...
This thrifted ($25) creamy-yellow dresser and mirror will provide a good amount of storage...
Big worktable from my former studio space in our previous home...
Fun yellow lamp and my kitschy 70s embroidery collection....


Hopefully we will be able to make substantial progress this week - if so, I will definitely be back next week to share the photos with all of you at Metamorphosis Monday!!  Thanks Susan for the opportunity to share with all of your readers and fellow participants - you are an awesome hostess!!

If you're still here reading this, you made it through a LOT of photos - thanks so much for your visit!! You are always welcome here at Just Bee 'n Me - I hope to see you again real soon!! God Bless!!

Monday, August 03, 2009

Studio Inspiration

(click any image to see details)
I N S P I R A T I O N
for my Studio
The collage I created above is like a digital inspiration board for the studio - snippets of things I love, colors that speak to me, items I've crafted, images that make me smile. As I've pondered the next steps with the Studio, my mind has (naturally) raced ahead to how I will decorate it. Let me begin the decorating discussion with a disclaimer:
I have eclectic tastes...there, I said it. I love bright colors. I love pastel colors. I love neutrals. And on any given day I can declare one as my most favorite of all, and the next day declare just the opposite... I drive myself crazy sometimes...
Here's the definition of eclectic:
1. selecting what appears to be best in various doctrines, methods, or styles;
2. composed of elements drawn from various sources
Yep, that about sums it up. The best term I have come up with to describe my eclectic "style" is Colorful/Whimsical Cottage...kinda like if Mary Engelbreit, Rachel Ashwell, and the editors of Romantic Home, Victoria, Country Living, and Romantic Country magazines all ran into each other, spilling all their designs, illustrations, samples, paints, photos, and fabric swatches into one gloriously diverse, colorful, fun pile of decorating bliss...
I know I am not alone in my decorating schizophrenia...I know you are out there too!
The only "method" I have devised to "manage" my eclectic decorating taste is to have three "firmly" established "guidelines":
  1. Rescue and repurpose whenever possible
  2. Surround yourself with things that make you smile
  3. There are no rules or wrong answers in this kind of decorating

The exciting thing about decorating a Studio is that you can take this decorating philosophy to its furthest extreme if you desire...it is a grown-up playroom you are creating after all! For my purposes, I will likely keep it comfortable and colorful and inspirational, but functional too. Speaking of function, what exactly does a primarily digital artist need with a Studio anyway..?

Well, I have A LOT of projects-in-waiting that require more space than just the kitchen table to tackle properly. Here are a couple of examples of the type of rescuing and repurposing I was referring to in Guideline #1...

BEFORE


AFTER


BEFORE

AFTER


I have BOXES and BOXES of stuff like this...


...that I want to craft into things like this...


Now WHAT I am going to do with these projects once they are complete is still somewhat unclear. For sure, I will be creating gifts for family and friends. In addition, perhaps I will open a booth/space again in a local antique store/flea market...? Perhaps I will have semi-annual Studio shows/sales...? Perhaps I will participate in various art/crafts shows here and there..? Perhaps I will sell online...? Perhaps I will develop patterns and/or submit ideas to crafts magazines. I really don't have a real clear direction yet, but I know the Lord knows. I'm counting on Him to direct my path...right now I am just certain of one thing - I am supposed to create...
______________________________

So, that covers the "why" question - next comes "how?" I have decided that I will paint the walls a soft buttery yellow - very much like the walls in my space at Whispering Willow last year...

From a practical standpoint, my Studio will need to accommodate this china cabinet (which has been in storage for months) - I love its soft yellow color...it definitely helped me to decide on yellow as the main color for the room.
I will also be fitting this dresser into the space...more cottage goodness. I'm sure I'll break down and paint/shabby it eventually...


Below are some other items that may find their way onto my Studio walls and into its nooks and crannies...this is a photo of one corner of my Studio in my previous home...I have a fairly large collection of vintage framed crewel/needlepoint/cross-stitch pieces that I have collected for years (this is just a few of them). I love crowding them all together on a wall... I'm sure the yellow lamp will fit right in as well. The dark bookcases (I have 2) are being used in our office in the mobile home currently. They will likely stay there, so I will be on the hunt, via Craigslist and garage sales, for more shelving for the Studio. Coming up with clever (cheap) storage ideas will be one of my biggest challenges...


Here is another view of my previous Studio - I will still be using the big desk on the left as my primary desk...


This past weekend sweet hubby and I went to a local church rummage sale - it was a really good one...great prices! I was blessed to find 8 matching creamy lace valances for just $2 total! I needed exactly 8 for the Studio (3 each on the two double window sets and 2 on the single window) , and there they were! ( I LOVE it when that happens!!) - I found some other goodies too that I will share in a future post...

______________________________

I've talked about "why" and "how" - now let's give you an update on "when"... The water heater episode ended up burning up the better part of the day on Thursday, so hubby has only had time to finish the insulation...the paneling and painting will have to wait until this week's time off. I STILL believe we can have it all finished by the end of August!!??!! I can't wait!!

______________________________

I'll share more Studio inspiration pieces as I gather them, Lord-willing...thanks for taking that little tour with me!! I hope you'll come back often to see the progress... You are ALWAYS more than welcome here!